Friday, November 8, 2013

For the Love of LaFazio: Creating With My Jane LaFazio Stencil


I've had a crafty crush on Jane LaFazio's work for a long time, so imagine my delight when I was selected to participate in a blog hop featuring one of her beautiful Stencil Girl stencils! Speaking of StencilGirl... they've got a great give-away on their blog, StencilGirlTalk. To enter, just leave a comment here or on any of the blogs in the hop (see the list below.) The more blogs you visit and leave comments... the more chances to win!


For my blog hop post, I chose Jane's Sweet Gum Balls stencil because it reminded me of fall, my family, and our blog hop theme: grateful. I am extremely grateful for my family and so many wonderful times with them. My grandparents had a sweet gum tree in their backyard and I have so many memories of collecting (and stepping on) those sweet gum balls during happy visits. These memories and the gratitude I have for them inspired me to create a patchwork paper cloth that incorporates these images and feelings.

Supplies I Used:
Freezer paper
Masking Tape
Roll of Rice Paper
Niji Splash Ink, magenta and yellow
Paintbrush, medium
Drying rack covered with plastic wrap
Scissors
Stencil
Pan Pastel (black) and applicator sponge
Deli Paper
Acrylic craft paint, hot pink
Spray fixative
Black Pitt Pen
Scissors
Liquid matte medium

Paint and Stencil Rice Paper

Step 1: Prepare your surface by taping down a piece of freezer paper, shiny side up.

Step 2: Cut a 2' sheet of rice paper

Step 3: Mix Splash Inks and water to create color washes.


Step 4: Cover the entire sheet of rice paper with color washes. The paper will be very wet and delicate.


Step 5: Carefully lift the sheet of painted rice paper. Place it on the drying rack and allow it to dry completely.

Step 6: Repeat steps 1-6 to create another sheet of painted rice paper.

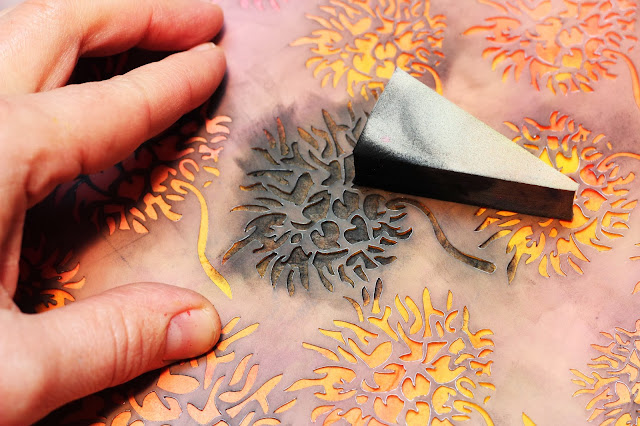
Step 7: Once dry, take one sheet from the drying rack. Randomly stencil the sweet gum ball images using black pan pastel. Take the sheet outside and spray it with fixative. Allow it to dry completely.


Stencil and Paint Deli Paper

Step 1: Randomly stencil the sweet gum ball images onto the deli paper using black pan pastel. Take the sheet outside and spray it with fixative. Allow it to dry completely.

Step 2: Paint a thin coat of acrylic craft paint onto the non-stenciled side of the deli paper.  Allow it to dry completely.


Create Journaled Rice Paper

Step 1: Cut a 1-2' piece of rice paper. Using a black pitt pen, write a poem, journal entry, or random words to cover the entire sheet of paper.

Step 2: Follow steps 1-6 above in the Stencil and Paint Rice Paper section.


Put the Pieces Together

Step 1: Cut random rectangles from each paper: stenciled rice paper, painted rice paper, journaled rice paper, and stenciled deli paper.


Step 2: Use liquid matte medium to adhere the rectangles to a long sheet of rice paper. Arrange the rectangles in a random pattern. Coat the front and back of each piece as you adhere it to the rice paper.


Step 3: Cut smaller pieces of each paper and use these pieces as tiny "patches" to bring the piece together.


The final result is a long sheet of beautifully patterned paper.


This paper can be used in a variety of ways. It can be hung, placed on a table, or sewn like fabric to create three dimensional pieces.


Thanks so much for visiting today! I hope you'll take a few minutes to visit all the beautiful blogs in our hop. I'm grateful you stopped by! 

The hoppers...

Monday, November 4, 2013

In the Midst of Chaos, Make Bracelets

October whizzed by. My house and studio make that quite obvious to me.

We've got interseason wardrobe pile-up (tank tops and sweaters wedged into crowded drawers, winter storage boxes left mid-raid on cold mornings, flip-flops and fuzzy boots jumbling up by the back door.)

My studio is also in complete disarray. As the staging area for Halloween costuming and decorating, it's been polluted with feathers, glitter, felt, and zombie blood.

Way too much pizza has been eaten in the last two weeks.

But in the midst of the chaos, I found time to sneak in a few experimental bracelets. I found these easy-to-braid leather bracelets for around $3 at Hobby Lobby.


I created this charm by riveting a brass star to a flat brass disc. Next, I embossed the piece with Ice Enamel powder. I put a layer of Ranger Melt Art UTEE (Ultra Thick Embossing Enamel) on top and melted the metal piece in my Melt Art melting pot. The Ice Enamel and UTEE are not designed to work together, but I wanted to see what would happen. The result was a really neat frosty effect.


For this one, I used a brass bezel. I painted the background with Vintaj patina paint in turquoise. After sanding it, I added some Ice Enamel powder around the edges. I crinkled hot pink wire into a heart shape and placed it into the bezel. Finally I put UTEE into the bezel and heated it in my melting pot.

Isn't it funny how random craft projects manage to sneak into our busy lives?!


Saturday, October 5, 2013

My Favorite Month is Here!

I love October! The weather is amazing in Georgia, the chocolate treats are abundant, and the smell of plastic Halloween decor fills the air.

I hope you'll take a moment to check out my fun paper doll project over at the Niji Creative Collective.
I had so much fun with this one!


Meanwhile... when you get a minute, visit the CraftDaily website. This website is filled with how-to video workshops covering just about every crafty topic you can imagine! My Collage in the Round workshop was just added, so you can visit and see a little blurb just for fun.

And now... off to the Crabapple Art Festival. It is going to be a beautiful day. I've gleaned my studio for anything that can possibly be sold. My booth is packed! My daughter is coming to be my helper and I'm sharing a booth with a very sweet friend. Happy all around!

Have a great weekend!

Tuesday, October 1, 2013

Collage: Up Close & Personal


A few posts ago, I told you all about a collage I was creating. I thought you might like to see how it turned out. This collage was a commission from a friend. Her sister turned 50 and she wanted to give her a unique gift. I asked her to give me some details that I could use to make it as personal as possible.


She is a homemaker and loves the color red. This chair is made from a piece of cereal box cardboard. I made a chair shape, covered it with old text, painted, and stitched it.


We've got to have a girly dress in there... she has two daughters and a sister. This skirt is made from stamped, gathered, and painted deli paper.


So lucky to find a little birthday-related text!


This house is another cereal box cardboard piece. I've used stitch, paint, ink, gel pens, watercolor crayons, and found text to give it tons of texture.


I found these two lines in an old typing manual. If you ever see an old typing manual at a book sale or garage sale... buy it! You will find so many word treasures inside!


As I delivered the finished piece, I was really nervous. What if I took it in the wrong direction? Thankfully, my friend loved it and I hear her sister did too. What a privilege to be part of someone's special day. Yet another way that art connects us!

Saturday, September 21, 2013

Oh Goodness, This is Some Fun!


I treated myself to a little shopping trip and splurge at Hobby Lobby last week. I found myself in front of an entire end-cap of Ice Resin products and a free project sheet by Jen Cushman, one of the Queens of Ice Resin. I'm such a kid about art supplies...the sparkly packaging was just more than I could resist.


I bought a variety of bezels and filled them with small pieces from my stitched paper stash.

 
I coated the cut papers with paper sealer, placed them into the bezels, filled them with Ice Resin, and waited overnight for them to dry. The result...  a handful of sparkly smooth objects, just begging to be made into funky adornments!

These pendants would be cute on a charm bracelet, necklace,

or earrings on simple hooks.

I used a variety of brass blanks along with more bezels to create this chunky charm bracelet. To create the enamel look on the blanks, I coated each piece with Iced Enamels medium, added a sprinkling of the Iced Enamels Relique powder, and heated the pieces with my heat gun. Once dry, I sealed each piece with Ice Resin.

Once you get rolling with these products, you will see so many ways to use them. I love the ability to make an inexpensive and personalized piece of jewelry that looks so unique!

I could include a detailed tutorial here, but if you want to try your hand at creating some Ice Resin jewelry, your best bet is to check in with the experts ... visit iceresin.com or Jen Cushman.

Hope your weekend is a happy and craft-filled adventure!

Tuesday, September 17, 2013

Summer is Fluttering Away

Finally we've got a day under 80 degrees! I feel the last few days of summer slipping away and I am so ready... ready to be rid of mosquitoes, ready wear bulky sweaters, and ready to quit shaving my legs so often!

I hope you'll take a moment to head over to the Yasutomo Niji Creative Collective blog and check out my Yasutomo Creative Team post for today. Here's the project I'm writing about.


Yasutomo Creative Team members will share new project tutorials every day, so sign up to follow and be inspired!

Saturday, September 14, 2013

Saturday Experiment: Ruffled Gelli-Printed Deli Paper


I could not decide where to begin this morning, so I just started stitching paper. Simply touching the papers in my scrap bin got my creative juices flowing. I decided I wanted to work with my gelli-printed deli paper scrap pile. I started by ripping all the pieces into strips.


When I make gelli prints, I always use deli paper to clean off my gelli plate between colors. I also use the deli paper to experiment with an idea before using the "good" paper. As a result, I've got quite a stash!

I stitched each strip side by side onto a plain sheet of deli paper. Once the sheet was filled, I cut it in half and stitched the two halves together to form one long piece. I then crumpled and un-crumpled the piece several times. The result reminded me of a wonderful ruffly skirt.


I am excited about how I might use this technique in my work. I see more experimenting in my future. I also see more Gelli printing... my stash is now running low!


Gelli printers...How do you use your printed deli paper stash?